V-Ray Frame Buffer
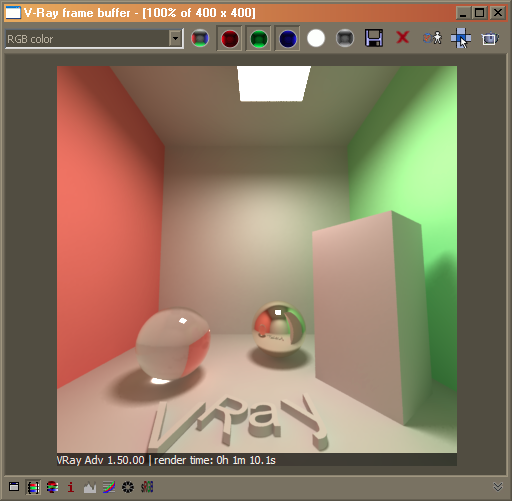
V-Ray Frame Buffer Overview
In addition to rendering to the 3ds Max Rendered Frame Window (RFW or VFB), V-Ray allows you to render to a V-Ray specific frame buffer, which has some additional capabilities:
-
Allows you to view all render elements in a single window and switch between them easily;
-
Keeps the image in full 32-bit floating-point format;
-
Allows you to perform simple color corrections on the rendered image;
-
Allows you to choose the order in which the buckets are rendered.
The V-Ray VFB also has some limitations, which are listed in the Notes section below.
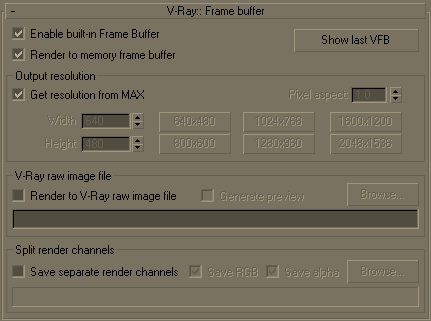
V-Ray: Frame Buffer
 Show last VFB
-
If you have rendered to the V-Ray VFB, but have closed it, this button allows you to open it again. The same can also be achieved with the showLastVFB()
MaxScript method of the V-Ray renderer.
Show last VFB
-
If you have rendered to the V-Ray VFB, but have closed it, this button allows you to open it again. The same can also be achieved with the showLastVFB()
MaxScript method of the V-Ray renderer.
Enable built-in frame buffer - Enables the use of built-in V-Ray frame buffer. Due to technical reasons, the original 3ds Max frame buffer still exists and is being created. However, when this feature is turned on - V-Ray will not render any data to the 3ds Max frame buffer. In order to preserve memory consumption we recommend that you set the original 3ds Max resolution to a very low value (like 100x100) and turn off the 3ds Max Virtual Frame Buffer from the common 3ds Max render settings.
Render to memory frame buffer - this will create a V-Ray frame buffer and will use it to store color data that you can observe while rendering and afterwards. If you wish to render really high resolutions that would not fit into memory or that may eat up a lot of your RAM not allowing for the scene to render properly - you can turn this feature off and use only Render to V-Ray raw image file feature.
Get resolution from 3ds Max - this will cause the V-Ray VFB to take its resolution from the 3ds Max common render settings.
Output resolution - this is the resolution that you wish to use with the V-Ray frame buffer.
Pixel aspect - specifie s the pixel aspect for the rendered image in the V-Ray frame buffer.
Render to V-Ray raw image file - when this is on, V-Ray directly writes to disk the raw image data as it is being rendered. It does not store any data in the RAM, so this feature is very handy when rendering huge resolutions for preserving memory. If you wish to see what is being rendered, you can turn on the Generate preview setti ng. You can specify either a .vrimg or an .exr file for output:
-
If you specify a .vrimg extension, the resulting file can be viewed through the File > View image... menu of 3ds Max, or converted to an OpenEXR file with the help of the vrimg2exr tool.
-
If you specify an .exr extension, V-Ray will write out a tiled OpenEXR file that can be used directly by 3ds Max or other compositing applications. The file contains all render elements for the image.
Generate preview - this will create a small preview of what is being rendered. If you are not using the V-Ray memory frame buffer for conserving memory (i.e. Render to memory frame buffer is off), you can use this feature to see a small image of what is being actually rendered and stop the renderer if there is anything that looks wrong.
Save separate render channels - this option allows you to save the channels from the VFB into separate files. Use the Browse... button to specify the file. This option is available only when rendering to a memory frame buffer. If rendering is done only to a raw image file, the render channels can be extracted from that file after rendering is complete.
Save RGB and Save Alpha - these op tions allow you to disable saving of the RGB and Alpha channels respectively. This can be useful if you only want to generate other render channels. Note that V-Ray will still generate the RGB and Alpha channels, however they will not be saved.
Hidden Parameters
Ther e are some additional parameters of the VFB, which are not available in the interface, but are accessible through MaxScript. These may be useful in certain situations. Below are listed the MaxScript names of these parameters.
output_renderType - This allows you to override the render type, specified in the 3ds Max settings. Possible values are:
-
0 - use 3ds Max render type (default);
-
1 - render the full image;
-
2 - region rendering;
-
3 - crop rendering;
-
4 - blow-up rendering.
output_regxmin - The left coordinate (in pixels) of the region to render (for region/crop/blow-up rendering);
output_regxmax - The right coordinate (in pixels) of the region to render (for region/drop/blow-up rendering);
output_regymin - The top coordinate (in pixels) of the region to render (for region/drop/blow-up rendering);
output_regymax - The bottom coordinate (in pixels) of the region to render (for region/drop/blow-up rendering);
VFB Toolbar
|
|
This part of the toolbar sets the currently selected channel, as well as the preview mode. Choose which channels to see with the help of the buttons. You can also view the rendered image in monochromatic mode. |

|
|
This will save the current frame data to a file.You can turn this on and of on-the-fly while rendering. |
|
|
This will create a 3ds Max virtual frame buffer copy of the current V-Ray frame buffer.You can turn this on and of on-the-fly while rendering. |
|
|
This will force V-Ray to render the closest bucket found to the mouse pointer. Drag the mouse over the V-Ray frame buffer while rendering to see which buckers are rendered first. You can turn this on and of on-the-fly while rendering. |
|
|
This option allows you to render regions in the V-Ray VFB |
|
|
This open permanently the info dialog which will give you information about the pixel you right-click the mouse pointer on. If you right-click the mouse pointer over a pixel without turning this setting on - then you will see the info dialog only while yuor mouse button is down |
|
|
This will open a so called "levels control" dialog which will let you define color corrections of various color channels. It will also show the histogram of the currently contained image data in the buffer. Click and drag your mid-button in the histogram to interactively scale the preview. |
|
|
Clears the contents of the frame buffer. Somethimes helpful when starting a new render to prevent confusion with the previous image. |


VFB Shortcuts
Here is the list of shortcuts you can use to navigate through the VFB image. Please note that VFB window must have the curent focus for the shortcuts to have effect:
|
Mouse |
Description |
|
CTRL+LeftClick, CTRL+RightClick |
Zoom in/Zoom out |
|
Roll the mouse-rollon button up/down |
Zoom in/Zoom out |
|
Double-click LeftButton |
Zoom to 100% |
|
RightClick |
Show the info dialog with the properties of the last pixel clicked. In order to see the info non-stop - turn on the info dialog button |
|
MidButton dragging |
view pan (hand tool) |
|
|
|
|
Keyboard |
Description |
|
+ / - |
Zoom in/Zoom out |
|
* |
Zoom to 100% |
|
Arrow keys |
Pan left, up, right, down |

Notes
-
The V-Ray VFB does not display the G-Buffer layers (like Coverage etc.);
-
The V-Ray VFB does not work with stripe rendering;
-
Even though you select the V-Ray VFB as your output, the 3ds Max VFB is still created and thus takes additional memory. If you want to reduce that memory , you need to uncheck the Get resolution from MAX option, set the 3ds Мax resolution to a low value like 100 x 100, and then select your real output resolution in the V-Ray VFB options.
-
If you have selected an output image file from the Common tab of the Render Scene dialog, V-Ray will fill out the 3ds Max RFW, and this will be saved as your image. If you want to save the V-Ray VFB instead, you should use the Split render channels or Render to V-Ray raw image file option of th e V-Ray VFB.
-
The OpenEXR file format is an open file format for high dynamic range images originally developed by Industrial Light and Magic. The official site of the OpenEXR file format is http://www.openexr.com/